martedì 9 giugno 2015

Poppy seeds lemon waffles con mirtilli / Poppy seeds lemon waffles with blueberries


Come promesso non poteva mancare la versione dolce dei waffles... più croccanti fuori e soffici all'interno perché cotti in forno,  e davvero golosi... con yogurt, mirtilli glossy e semi di papavero.

E se vi sieti persi i waffles salati...ecco il link!
Lemon ricotta waffles con insalata di zucchine

As promised it could not "miss" the sweet version of waffles...more crunchy outside and soft inside because cooked in the oven, and really delicious...with yogurt, glossy blueberries and poppy seeds.

And if you lost our salty waffles post...here is the link!
Lemon ricotta waffles with zucchini salad


Ingredienti (per circa 6 waffles con stampo in silicone)
2 uova
200g farina per dolci
1/2 cucchiaio di lievito per dolci
2 cucchiai di zucchero alla vaniglia
1 pizzico di sale
scorza di 1 limone
150ml latte
50g burro fuso (+ per spennellare)
semi di papavero

mirtilli
yogurt
succo di limone
zucchero a velo

Setacciare la farina, aggiungere lievito, sale, scorza di limone e semi di papavero (qb) e mescolare bene.
Aggiungere ai tuorli il burro fuso (assolutamente freddo e a filo) mescolando con una frusta, unirvi il latte (meglio se intero) poco alla volta continuando a mescolare finche ben amalgamato. Unire la farina al latte coi tuorli mescolando con una frusta per evitare che si formino i grumi. A parte montare i bianchi a neve ben ferma e unirli al composto mescolando con una spatola dal basso verso l'alto.


Versare il composto nello stampo in silicone o nell'apposita piastra, precedentemente spennellati con burro morbido.
Se usate la piastra per waffles versate il composto e lasciare cuocere per qualche minuto, saranno pronti quando ben dorati, rimuoveteli aiutandovi con uno stecco o la punta di un coltello per non scottarvi.


Se usate lo stampo in silicone ecco alcuni consigli:
.mettere lo stampo vuoto in forno durante il preriscaldamento (aiuterà la cottura);
.spennellare con burro morbido lo stampo caldo prima di versare il composto (lo stampo è antiaderente ma il burro rende la superficie dei waffles più dorata e croccante);
.durante la cottura posizionare lo stampo nella parte più bassa del forno;
.preriscaldare il forno a 220° C (ventilato) e cuocere per 15 minuti, se necessario continuare la cottura (statico solo sotto) finche ben dorati.


Serviteli caldi con ciò che vi stuzzica di più...noi li abbiamo provati con yogurt greco e mirtilli  ( fatti in padella con un po' di succo di limone e zucchero a velo, bastano pochi minuti a fuoco medio e saranno lucidi e golosi...da provare anche con il gelato)...buonissimi!
Perfetti per una ricca colazione o un brunch in compagnia. Enjoy...

Abbiamo usato lo stampo in silicone per waffles di Silikomart


Ingredients (for about 6 waffles with silicone mold)
2 eggs
200g cakeflour
1/2 tbspoon baking powder
2 tbspoons vanilla sugar
a pinch of salt
lemon zest
150ml milk
50g melted butter (+ for brushing)
poppy seeds

blueberries
yogurt
lemon juice
icing sugar

Sift the flour, add baking powder, salt, lemon zest, poppy seeds (as enough) and mix well.
Add to the yolks the melted butter (absolutly cold!) little at a time continuing stirring with a wisk and add milk (better if Whole milk) little at a time continuing stirring until well amalgamate. Add the flour to the milk and yolks stirring with a whisk to prevent lumps. Mount the whites until stiff and incorporate to the mix stirring with a spatula from bottom up.


Pour the mixture into the silicone mold or into the waffles plates previously brushed with soft butter.
If you use plates your waffles will be ready in a few minutes, take them out when Golden brown with the aid of a stick or the tip of a knife to avoid scalds.


 If you use the silicone mold here are some tips:
.put the empty mold in the oven during preheating (it helps the cooking of waffles);
.brush the hot mold with soft butter before pouring the mixture (the mold is nonstick but the butter will help the browning and will make the surface more crunchy);
.position the mold in the lower part of the oven during cooking;
.preheat the oven at 220°C (fan) and bake for about 15 minutes, if necessary continue cooking (static just bottom) until Golden brown.


Serve them hot with what excites you more, we tried them with greek yogurt and blueberries (put them on a pan with lemon juice and icing sugar and cook on medium heat just for a few minutes, they will be glossy and really delicious, to taste with ice-cream too)...so good!
Perfect for a rich breakfast or a brunch with friends. Enjoy...

We used a silicone mold for waffles by Silikomart


Le posate vintage ci piacciono tantissimo, danno un tocco di eleganza alla tavola / We like vintage cutleries so much, they give an elegant touch to the table


venerdì 29 maggio 2015

Lemon ricotta waffles con insalata di zucchine / Lemon ricotta waffles with zucchini salad


Oggi versione salata (e veggie...con le primissime zucchine della stagione del nostro orto!) dei famosissimi waffel (o gaufre): un dolce tipico del nord Europa croccante fuori e morbido all'interno (ma siamo sicuri che le presentazioni non siano necessarie). Assaggiato per la prima volta (con panna e composta calda) in una freddissima e bellissima Praga, come dimenticarlo?!
Di solito viene cotto in una piastra apposita che gli conferisce la classica forma a cialda, ma noi questa volta lo cuociamo in forno con stampo in silicone.
P.S.Continuate a seguirci perché è in arrivo anche la versione dolce (ovviamente eh!).


Today salty version (and veggie...with our very first zucchini of the season from our veggies garden!) of the so famous waffles (or gaufre): a typical dessert of northern Europe crunchy outside and fluffy inside(but we are sure they don't need any introductions). Tasted for the first time (with cream and warm jam) in a really cold and beautiful Prague, how to forget it?!
They are usually cooked in a special plate that gives them the classic gauffre look, but this time we bake them in the oven with the silicone mold.
P.S. Stay Tuned beacuse the sweet version is coming up too (well, of course!).


Ingredienti per circa 6 waffles (con stampo in silicone)
180g farina00
2 uova
una presa di sale
scorza di 1 limone
100ml latte
50ml acqua
100g ricotta fresca  
50g burro fuso (+ per spennellare)
2/3 zucchine
erba pepe (aromatica)
succo di limone
senape al pepe verde
olio evo
ricotta fresca
sale alla vaniglia

Setacciare la farina, aggiungere: lievito, sale e la scorza di limone e mescolare. Aggiungere il burro fuso (assolutamente freddo) ai tuorli (mescolando con una frusta) e il latte prima e l'acqua poi, poco alla volta sempre mescolando. Amalgamare bene e a parte montare i bianchi a neve ben ferma. Unire la farina ai tuorli mescolando con una frusta (per evitare che si formino grumi), aggiungere la ricotta e amalgamare bene. Unire i bianchi mescolando con una spatola di gomma dal basso verso l'alto. Versare il composto nella piastra rovente o come abbiamo fatto noi nell'apposito stampo in silicone, entrambi devono essere precedentemente spennellati con del burro morbido.


Se usate la piastra i waffles cuoceranno in pochi minuti, rimuoveteli quando saranno dorati aiutandovi con uno stecco o la punta di un coltello per evitare di scottarvi.
Se, come noi, usate lo stampo in silicone e la cottura in forno ecco alcuni consigli:
.preriscaldare il forno a 220°C (ventilato), cuocere per 15 minuti circa, se necessario continuare la cottura per altri 5 minuti circa (statico sopra e sotto) o finchè ben dorati;
.posizionare lo stampo vuoto in forno durante il preriscaldamento (aiuta la cottura);
.spennellare lo stampo caldo con burro morbido prima di versare il composto (lo stampo in silicone è antiaderente ma il burro favorirà la doratura e renderà la superficie più croccante);
.posizionare lo stampo nella parte più bassa del forno durante la cottura.


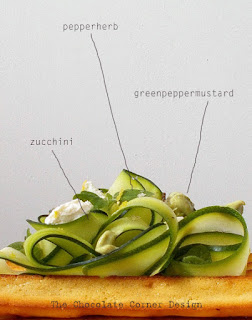
Serviteli caldi con ciò che vi stuzzica di più. Li abbiamo provati con un'insalata fresca e profumata di zucchine crude (ma potete grigliarle se preferite) tagliate a fettine sottili (con il pela patate)e condite con olio extravergine d'oliva, succo  e scorza di limone, erba pepe (un'erba aromatica molto profumata e pepata, ci ricorda tantissimo i profumi di montagna, non è facilissima da trovare ma potete sostituirla con basilico o menta), senape al pepe verde (buonissima), ricotta fresca e sale alla vaniglia (ottimo con molti piatti salati, provatelo con carne o crostacei- se non lo trovate già pronto aggiungete i semi di una bacca al sale in scaglie o al sale in grani battuto col pestello).
Perfetti per un pranzo easy o un grande brunch. Provateli come preferite and Enjoy...

Abbiamo usato lo stampo per waffles in silicone di Silikomart

P.S. In arrivo un'altra ricetta golosissima con la senape al pepe verde e l'erba pepe!


Ingredients for about 6 waffles (with silicone mold)
180g flour00
2 eggs
an handful of salt
1 lemon zests
100ml milk
100g fresh ricotta
50ml water
50g melted butter (+ for brushing the mold)
2/3 zucchini
pepperherb (aromatic)
lemonjuice
greenpepper mustard
extravergin olive oil
fresh ricotta
vanilla salt

Sift flour, add yeast, salt, the lemon zests and mix well. Add the melted butter (absolutly cold) into the egg-yolks stirring with a whisk and then add milk first and water after little at a time continuing stirring to mix well.
Whisk the whites until stiff, add the flour to the yolks stirring with a whisk to prevent lumps. Add the fresh ricotta (italian soft and fresh cheese, if you have not you can replace it with creamcheese) and amalgamate well. Incorporate the whites with a spatula mixing from bottom up. Pour the mixture into the mold or into the plates previously brushed with soft butter.


If you use the plates waffels will be ready in a few minutes, remove them when Golden brown with the aid of a stick or the tip of a knife to avoid scalds.
If you use the silicone mold and the oven cooking here are some tips:
.preheat at 220°C (fan) and bake for about 15 minutes, if necessary continue cooking for 5 minutes more (static top and bottom). Remove them from the oven when Golden brown;
.put the mold in the oven during preheating (it will aid the cooking);
.brush the hot mold with soft butter before pouring the mixture (the silicone mold is nonstick but the butter will help the browning and will make the surface more crunchy;
.during cooking position the mold in the lower part of the oven.


Serve them hot with what excites you more, we tried them with a fresh and scented salad with raw zucchini (but if you prefer you can grill them) thinly sliced (with the potato peeler). We seasoned the salad with extravergin olive oil, lemon zest and juice, pepperherb (not easy to find, it is an aromatic herb really fragrant with a pepper taste, it reminds us to mountain scents, if you have not you can replace it with basil or mint), greenpepper mustard (so good) and vanilla salt (delicious with many savory dishes, try it with meats or crustaceas, if you don't find you can make it just adding vanilla seeds to crystals salt or to salt in grains pressed down with a pestle).
Perfect for an easy lunch or a big brunch. Try them as you prefer and enjoy...

We used a silicone mold for waffles by Silikomart

P.S. Another gorgeus recipe with pepperherb and greenpepper mustard is coming up soon!


Le nostre zucchine! Our zucchini!


giovedì 21 maggio 2015

venerdì 8 maggio 2015

The "Boom Boom Pow" Salad (con fagioli occhio nero / with black eyed peas)


E' arrivato quel bellissimo periodo dell'anno nel quale si raccolgono i primi frutti del lavoro nell'orto. L'insalata è pronta e noi ne approfittiamo accompagnandola ai fagioli occhio nero in un piatto fresco, leggero e che sa di Estate.
Siamo convinti che l'orto faccia bene al corpo e alla mente, se non l'avete ancora fatto, provate a coltivare (anche in qualche vaso fra i fiori sul terrazzo)...raccogliere è una vera soddisfazione.

P.S. Il nome che abbiamo dato a  questa insalata arriva dal titolo di una canzone dell'album  "THE E.N.D" dei Black Eyed Peas...non poteva essere altrimenti!

And 'come that beautiful time of the year in wich you begin to reap the fruits of the work in the veggies garden. The salad is ready and we take the opportunity to accompanying with the black eyed peas in a plate fresh, light and that smells of Summer.
We are convinced that the veggies garden is good for the body and mind, if you not already done so, try to grow (even in a few pots among the flowers on the balcony)...pick up is a real satisfaction.

P.S. The name we gave this salad comes from the title of a song on the album "THE E.N.D." of Black Eyed Peas...could not be otherwise!


Ingredienti
lattuga riccia rossa
fagioli occhio nero
foglie di tatsoi
finocchietto selvatico
formaggio di capra fresco
semi di sesamo
fiori di rosmarino
prugna disidratata a dadini
olio evo
succo di limone
sale
senape

Mettere a bagno i fagioli (in realtà appartengono alla famiglia dei piselli, ecco perché in inglese sono detti black eyed peas) in abbondante acqua per almeno 6 ore, sciacquare e lessare in abbondante acqua salata per circa 2 ore o finche della consistenza desiderata. Sciacquare con acqua fredda per fermare la cottura e scolare.


Preparare l'insalata è ovviamente molto semplice e potete togliere o aggiungere per creare la combinazione che più preferite.
Disporre le foglie di lattuga precedentemente lavate su di un piatto (la lattuga ha proprietà purificanti, noi abbiamo usato la nostra rossa riccia), aggiungere i fagioli occhio nero (ricchi di proteine e poveri di grassi), qualche rametto di finocchietto selvatico (digestivo) molto fresco e profumato, foglie di tatsoi (un'insalata di origine Cinese - coltivata anche in Giappone - della famiglia dei cavoli - fresca e dal sapore di senape - adatta anche per zuppe), formaggio di capra fresco, semi di sesamo (ricchi di calcio, fosforo, magnesio, ferro e proteine), fiori di rosmarino per una leggera nota aromatica e qualche cubetto di prugna disidratata per un tocco dolce in perfetto contrasto con il condimento fatto con olio extravergine d'oliva (usate sempre un buon olio - abbiamo usato un olio del Garda - leggero e fruttato), qualche goccia di limone, un pizzico di sale e la senape per un tocco piccante. Un piccolo consiglio: mettete gli ingredienti per il dressing in un vasetto di vetro, chiudete il coperchio, shakerate per amalgamare bene e versate sull'insalata appena prima di servire.


Perfetta per un pranzo veloce con crostini o crackers croccanti o da gustare in compagnia per una cena easy illuminata dalle luci del tramonto.
#We go green...enjoy!


Ingredients
red curly lettuce
black eyed peas
tatsoi Leaves
wild fennel
fresh goat cheese
sesame seeds
rosmary flowers
dry plums cubes
extravirgin olive oil
lemon juice
salt
mustard

Sock the peas in water for about 6 hours, drain and boil in abundant salted water for about 2 hours or until they reach the desidered consistency. Drain and rinse with cold water to stop the cooking.


Prepare the salad is very simple of course and you can add or subtract anything to get the combination you prefer.
Arrange the cleaned lettuce leaves on a plate (lettuce has purifying properties - we used our red curly) add the black eyed peas (rich in protein and low in grass), the tatsoi Leaves (a salad of Chinese origin - cultivated in Japan too - cabbage family - fresh with a mustard flavor - also suitable for soups), fresh goat cheese, sesame seeds (rich in calcium, phosphorus, magnesium, iron and protein), Rosemary flowers to give a soft aromatic note and just a few litlle cubes of dried plums, a sweet touch to a perfect contrast to the dressing made with extravergin olive oil (Always use a good oil - we use a oil from Garda lake -Italy- light and fruity) a few drops of lemon, a pinch of salt and a touch of spicy mustard. Just a little tip: put the ingredients for the dressing in a glass vase, close it, shake to mix well and pour on the salad just before serving.


Perfect for a quick lunch with some toasts or crunchy crackers or to enjoy with friends for an easy dinner in the sunset lights.
#We go green...enjoy!


Un grazie speciale ai nostri papà! / A special thanks to our fathers!

Dall'orto / From the veggies garden


...e dal giardino / ...and from the garden


Provate la ricetta della schiacciata croccante, è perfetta con l'insalata!
Try the recipe of our crispy "smash", it's perfect with salad!